What makes a certain mix so alluring? What is it that appeals? What is a "magic" combination and what is just plain WRONG?
What colours make something look vintage? Olde-Worlde? Romantic? Rustic?

What are true primaries? What are Tertiaries? What are Complimentaries? How about Split Complimentaries?
I found the following link to Basic Colour Theory to be a good basic start.
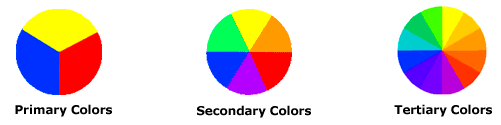
(a)Your Basic Primary Colours are just three - Yellow, Blue and Red, that's it!
(b)Secondary Colours are the "in betweens" - a mix of two Primary colours sitting next to one another on the wheel, i.e. Red and Yellow mixed = Orange
Yellow and Blue mixed = Green
Blue and Red mixed = Purple
and again, that's it!
(c) ahhhhh....Tertiary Colours are those that go even deeper into the mix, i.e. from Red going into the Yellow spectrum we get Orange but with a little more red it becomes Salmon, or with a little blue to create a brown shade, you get a little Mustard or Saffron....these combinations can go on, ad infinitum.
Now, as we all know White and Black are not colours but are vital to give contrast, to provide nuances, mood...and mixed with any Primary or Tertiary colour will change the HUE, the shade. The lights and darks of each shade (hue) come about when mixed with either white or black, softening or deepening as you saturate....

When choosing colours for, say, a multi-coloured blanket for instance - this is where you could create something visually wonderful or quite "Bleh" or even...horrors, a vision of downright nasty...!.
Just remember - Complimentary colours are those which are directly opposite one another on the spectrum.
Glance at the Colour Wheel - you can see opposite colours are Red and Green, Purple and Yellow and Blue and Orange.
Split Compimentary colours on the other hand are taking colours opposite one another, then splitting them by choosing one on either side of the opposite. Look above, e.g. violet, yellow-orange and yellow-green (lime). A good tip to remember when making a striped blanket or garment and you need a little help in choosing which colours to place right next to one another....
Keep a comprehensive colour wheel handy to refer to when choosing yarns for your next project and soon it will become "second nature". You will move into the realm of "personal preference" without making colour blunders.
By Jove! I think she's got it!
Now you KNOW the Rules - go ahead and BEND them!


